If you’re experiencing some issues with the volume on your AirPods, you’re not alone. It often happens that one individual AirPod is louder (or softer) than the other. Luckily, this problem can be easily fixed in several different ways.
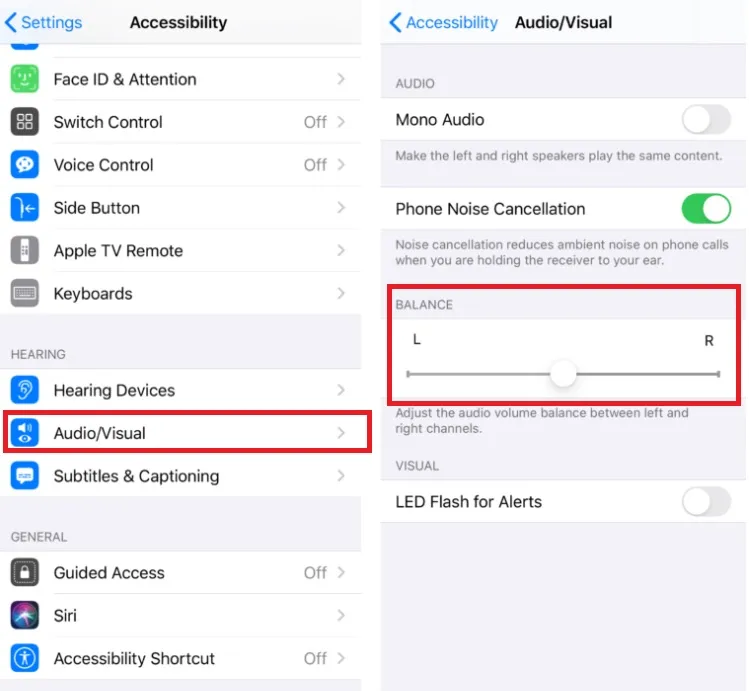
To fix the volume difference on your Apple AirPods (Pro), determine if your left or right AirPod is louder. In the AirPods app on your iPhone, go to Settings > General > Accessibility. Under “Hearing”, alter the audio volume balance between the left and right AirPods with the slider.
If this solution did not help you, there are other ways to fix the problem. Quiet or muffled AirPods usually also need some proper cleaning as well. But first, you should try changing the settings.
1. Change AirPods Volume Settings In The App
If you want to rebalance the volume balance on your AirPods Gen 1 or 2, follow the steps below to change the balance in the app:
- Update to the latest iOS software version (if needed)
- Open your ‘Settings’ app on your paired device (iPhone or iPad)
- Navigate to Accessibility > Audio/Visual > Balance
- Under “Balance” you can adjust the volume balance between the left and right channel using the slider

If you’re using iOS 12 or older, these settings are located under “Settings > General > Accessibility > Hearing”. This should allow you to adjust the volume on the left and right channels individually.
For AirPods Pro, you could adjust the volume settings manually in transparency mode:
- Update to the latest iOS software version (if needed)
- Open your ‘Settings’ app on your paired device (iPhone or iPad)
- Navigate to Accessibility > Audio/Visual > Headphone Accommodations > Transparency Mode
- Choose ‘Custom Transparency Mode’ and switch it on
- Adjust the ‘Transparency Balance’ slider between the left and right channels
Alternatively, AirPods Pro users can access their Transparency Mode settings by tapping the Hearing icon in the Control Center. More information and details can be found in this Apple Support guide. But to be honest, the second solution below is an easier fix.
2. Disconnect AirPods From Your Device
Another thing you can do is disconnect your AirPods from your iPhone or iPad (or any other device you’ve connected it to). To disconnect your AirPods from any Apple device, do the following:
- Open the ‘Settings’ app on your connected device (iPhone or iPad)
- Choose Bluetooth
- Tap the “i” icon next to your AirPods at ‘Devices’
- Choose ‘Forget This Device’
- Confirm to ‘Forget Device’ in the pop-up message

After having disconnected your device from the AirPods, you are free to reconnect them again (or connect to another Apple device). In order to reconnect your AirPods to a device, do the following:
- Open the ‘Settings’ app on your connected device (iPhone or iPad)
- Choose Bluetooth (and make sure its turned on)
- Put your AirPods in the charging case (keep the lid opened)
- Press and hold the button on the back of your charging case until the light flashes
- Select your AirPods in the Bluetooth devices list on your connected device
3. Use One AirPod, Then Put It Back In The Case
The easiest ‘lifehack’ to fix the problem, is surprisingly simple. It’s simply using the charging case to reset the volume balance on your device. All you need to do for this method is the following:
- Take the AirPod that is louder and use it by itself (one AirPod only)
- Put the AirPod back in the charging case (the other should also be in there)
- Make sure to close the charging case with both AirPods inside
- This should reset the volume balance instantly!
It’s somewhat unclear why the issue is solved this way, but it’s probably got something to do with the default volume balancing that’s used for the wireless Apple earbuds. For this method to work, you need to make sure the devices are clean and can connect to your charging case.
4. Clean Any Dirt From The AirPods
The bottom of the AirPod is the place where the microphone is located. But it’s also the place where most of the dirt and gunk builds up over time, which causes your device to have problems reconnecting to the charging case.
It’s important to keep the microphone opening clean, but also make sure the inside of the charging case is equally dirt-free.
Simply open up the charging case, look inside the hole in which you place an AirPod, and make sure that no dirt is in there. If both the connector and the device are clean, docking it should be easier. The docking process automatically resets the volume balance on your device.
If you’re unsure how to clean wireless Apple earbuds, check out the video below by zollatech:
5. Suck On AirPods That Are Too Soft
In a non-suggestive manner, of course. Sucking on the biggest speaker is a strange, but effective way to fix any volume anomalies. Are your AirPods too soft or quiet compared to each other, then you might want to start using your mouth on them.
For hygiene purposes, I sincerely hope you cleaned them beforehand (but don’t use water).
While it might sound a bit gross, ear wax can accumulate inside the AirPods. This means that you’ll be sucking that out. If that makes you gag, have some water ready and wash your mouth right after. It’s not bad for you to swallow it, but it’s not very tasty, trust me.
6. Get A Replacement Using Apple Warranty
If you really can’t get the job done, make sure to contact Apple Support or go to an Apple Store (or Apple-authorized retail store) near you to get a replacement. Alternatively, you can ask them to look at your device and repair it if needed.
If you want to use your warranty, make sure that it’s still valid. Bring the original box and receipt to the Apple Store.
If you’re in the AppleCare+ program, you’ll be eligible for immediate replacement. Otherwise, it will likely take a few weeks to make repairs, or receive a replacement device if the issue cannot be solved.
If this guide helped you (or if you have some feedback for improving it), feel free to share it or leave a comment in the discussion section below!
